3 lesser-known LinkedIn features you should be using
There is no doubt LinkedIn has become one of, if not the most powerful marketing tools of the 21st Century. With over 300+ million members and 49% of them being key decision makers, it’s never been faster, easier and more cost effective to get your message in front of potential clients, journalist, partners and even future employees.
Whilst it’s a powerful marketing tool, in our experience of training thousands of business owners, we’ve realized that very few are using it to its full potential.
In this post, I'll look at some practical features that also help towards getting more leads and in using LinkedIn more generally to build your contacts contact.
For more details on how to use the latest features on LinkedIn, download our guide.
Download Premium Member resource – 7 Steps to LinkedIn Marketing
Understand how to best use all of the features of LinkedIn as an individual or as a business.
Access the Smarter LinkedIn marketing guide
The Three Less-well known LinkedIn Techniques
There are many tips and tricks about the platform that most business owners don’t know about, so many that we could literally write a book about it. However in this post, I'm going to focus on the top 3 that are the most common.
1. Hiding your connections
This feature gives you the flexibility to control how open or private you make your connections to others within your network. You can set your settings so that your connections are only visible to you or those who are also connected with you.
My personal recommendation is to make your connection private so that it’s only visible to you. This will stop competition, recruitment companies and others accessing a network of potential clients, employees and channel partners you’ve worked hard to build a relationship with over the years.
To make the necessary changes, 1) Scroll to the upper-right hand corner of your LinkedIn profile, in the drop down menu select: Privacy & Settings. 2) Then click on the link “Select Who Can See Your Connections” and from there choose the option: “Only Me” When this is done, save your changes.
2. Becoming anonymous when viewing other people's profiles
For any number of professional, legal, personal, or other reasons, you may not want other LinkedIn users to know you are viewing their user profiles. Sometimes you just need to be an anonymous viewer.
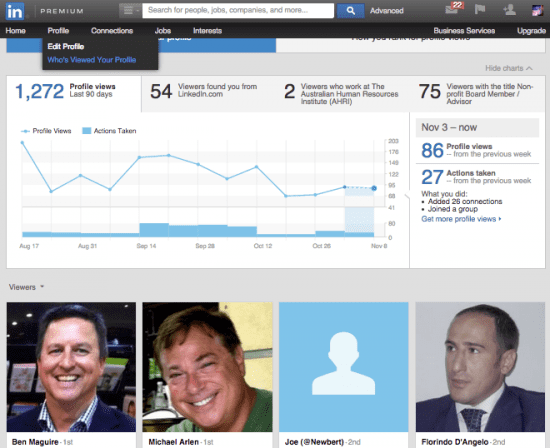
By default LinkedIn sets up all profiles to report their LinkedIn user name and headline to every other user profile they have viewed, unless the viewing user has specified otherwise.
LinkedIn shows this information in the viewed user’s LinkedIn notifications screen and on the Who’s viewed your profile screen.
To change your settings go back to your Privacy & Settings section of your profile. Go to the tab marked privacy, then select 'profile viewing options'- a screen that looks like this will then appear:
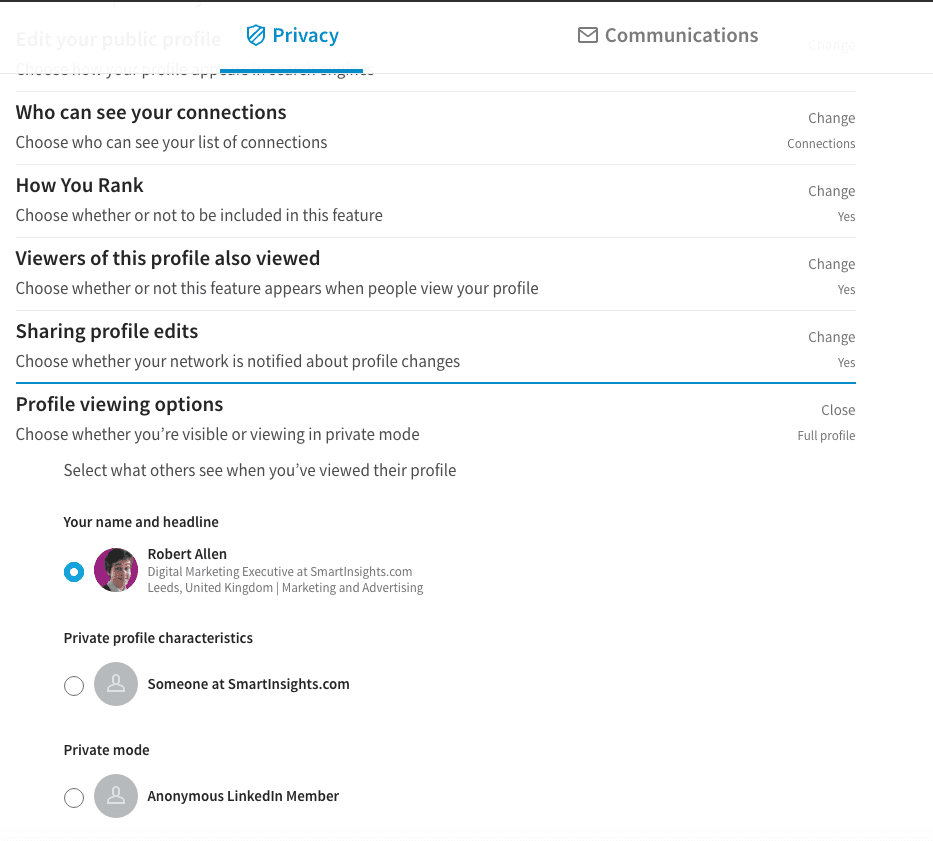
Select the degree of anonymity you want to present to other users. By using this screen, you can change your viewing privacy settings between total, partial, and anonymous identification as you please.
Make sure to change this feature back to the default settings when you’re finished investigating, especially if you are reaching out and connecting with people given the likelihood of a new contact connecting with you is far greater when they see that you have viewed their profile.
3. Deleting, editing and managing your endorsements
One area of your LinkedIn profile that is extremely important when building your online portfolio is your Skills & Expertise section.
In a nutshell, it’s a 'point and click' way to endorse someone, or to have someone endorse you. It adds tags that make your profile more easily found by search engines and LinkedIn searches, and provides a consistent set of search terms.
I can’t tell you how many profiles we come across every week that have 10, 15, 20 and sometimes up to 50 skills and expertise endorsed within their profile. Not only does this make your profile look messy it also shows that you are a generalist not a specialist.
Whilst LinkedIn allows you up to 50 skills listed, my recommendation is that you should only have 3-5 skills and expertise listed on your profile, don’t accept anything outside of these skills and delete any existing skills listed within your profile.
Now before you do this you may want to do some research online along with speaking to some of your clients to get a good understanding of what skills or expertise your target market are looking for in an expert within your field before inserting them into your profile. When you have your skills and expertise ready, simply hover over the profile tab and select “Edit Profile” in the drop down menu. Then scroll down to the skills and expertise section of your profile and click “Edit”.
Within this section you can remove any endorsements you no longer want, add new skills you want to be endorsed for, manage the endorsements you’ve received within each particular skills or expertise and much more!
When you are finished updating this section be sure to click on “Save” to ensure all your changes are updated. If you don’t see this section within your profile it simply means you haven’t yet received any endorsements.
I would be interested to hear your thoughts, tips or insights on any cool features you’ve used within your LinkedIn activity. Feel free to connect with me on LinkedIn to share your experience!
