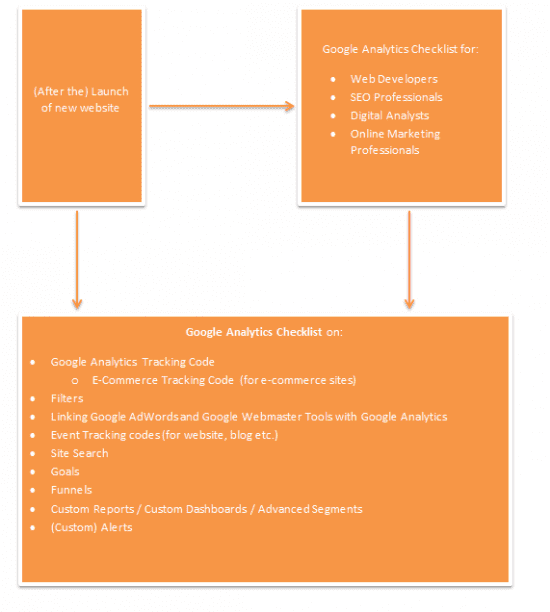
Your Google Analytics Post-launch checklist
In my last post on using Google Webmaster Tools to audit a site post-launch I showed how after the creation of a new or redesigned website, there are many other issues to consider before a new website can be considered to be fully functional. Another key post-launch activity is to check that the effectiveness of the site will be measurable using Google Analytics. Here it’s important to make sure to have a Google Analytics checklist in place to review how to best customise Google Analytics to report on your business success.
[Editor's note: we agree that setting Google Analytics up is often missed on new sites. In particular we see that many don't have goals setup, so thanks to Vagelis for his detailed review and recommendations in this post. In fact we'd advise considering goal setup and tracking at an early stage in site development rather than post launch. Smart Insights Expert members can see our detailed recommendations on this in our Google Analytics guide and setup template download].
Ideally these checks (and where necessary ,the implementation of certain tasks) should take place as soon as possible one or two days from the moment the website is launched.
This check-list should include standard Google Analytics tasks for each website (e.g. proper implementation of the tracking code depending on the type of our website, use of advanced segments, filters, linking of Google Webmaster Tools and AdWords with our Google Analytics account etc.) or customised Google Analytics tasks based on the needs of each website (e.g. set up of goals, funnels, creation of customised reports, dashboards, event tracking codes etc.).
This essential checklist on Google Analytics concerns:
Implementation of Google Analytics Tracking Code
Even though it sounds a very basic task, it is fundamental to ensure that the Google Analytics tracking code has been properly implemented and that it is properly reporting data. Thus, once the website is launched it is necessary that the tracking code (which is unique for each website) should be already implemented in the site. As it can take up to 24 hours until the tracking code is properly reporting data, then it is important to check the next 24-48 hours that the Google Analytics is properly running.
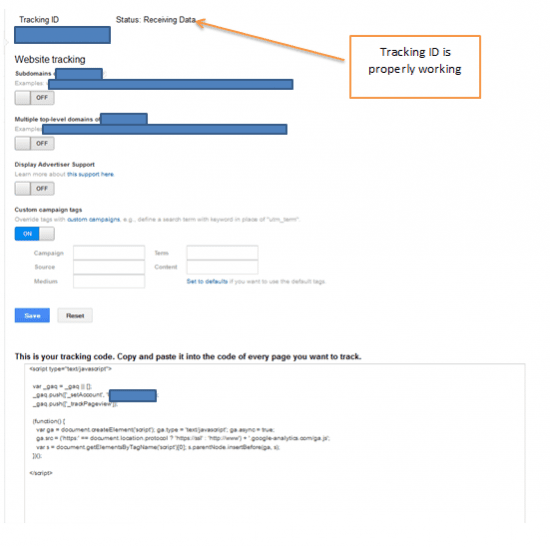
All we need to do, in order to confirm the proper implementation of Google Analytics tracking code is to go to the respective account that we are handling: Admin > Property > Tracking Info :

E-commerce Tracking Code
It is important to highlight out the fact that in the event that we have an e-commerce site we will need to activate the respective toggle (Admin > View > View Settings) for the e-commerce tracking code, under the ‘View Settings’:

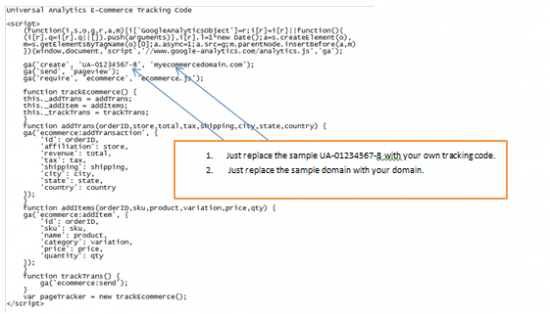
In case we are managing an e-commerce website (with Universal Analytics), the (sample) code that should be installed is:
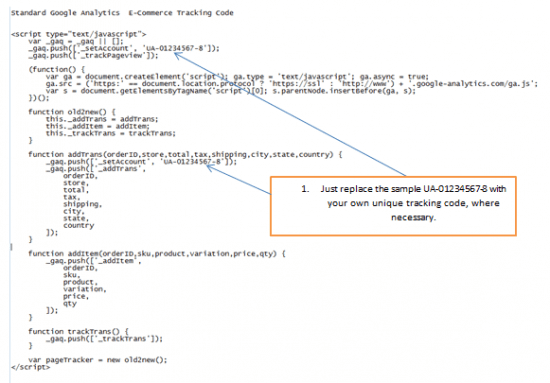
In the case that our e-commerce website has standard – not Universal Google Analytics (with asynchronous syntax), this is the (sample) tracking code that should be used:
In the event of cross domain tracking for which we are using a 3rd party shopping card then a slightly different process needs to be implemented.
Why do we need to install the e-commerce tracking code (in the event of having an e-commerce site or a hotel website)? We will be able to have access on transactional data such as: e-commerce conversion rate, transactions, revenue, average value, unique purchases and quantity etc.
Implementation of Event Tracking Codes
For those who are not still familiarised with Google Tag Manager, it is important to start implementing event tracking codes (see tutorial) in order to detect any weaknesses of certain elements of our website in order to conduct split testing (by using Content Experiments) and improve our conversion rates.
For example, let’s assume that we have a set a lead-based goal (to receive as many contacts as possible from our contact form). However, we are not receiving any submissions through our contact form. With the use of event tracking codes we can identify if our contact form is problematic, if visitors are abandoning our form before filling it out and then we can take certain actions. For example, with Content Experiments we will be able to change this negative situation by creating two or more variation pages, by increasing/decreasing the number of fields, changing the size of the fields or by amending the Call-To-Action (CTA).
Thus, a basic implementation of event tracking codes is essential in order to make sure that we will be monitoring effectively our conversions and intervene if that’s necessary.
Standard event tracking codes that each website should have (indicative list):
- Contact forms
- Form Completion Abandonment
- Tracking form errors
- Outbound links
- Newsletter subscriptions
- Social media sharing buttons
- Videos (for Play, Pause, Stop)
Customised event tracking codes (indicative list):
- For chat – as part of the customer support service, a chat widget can be implemented within the website to track each time (for instance) visitors that have contacted with customer support.
- For (online) booking forms - for hotel websites.
- Product Ratings - for e-commerce sites.
- Baskets and checkouts - for e-commerce sites.
After the launch of our new site and the implementation of event tracking codes we will be able to keep track of any important actions related to our website through Google Analytics (Behaviour > Events > Overview).
In the event we have created a (multi-authored) blog that is considered as potential traffic generator we will be able to gather accurate data – by implementing event tracking codes- on:
- Scroll reach tracking
- Blog comments
- PDF Downloads
Set up Goals
Before the launch of a website it is important to know for our client which conversions we need to monitor (e.g. transactions, bookings, newsletter subscriptions, contact form completions etc.). Our client’s goals should be aligned with the goals that we are going to set up on Google Analytics.
The best way to measure our conversions can be achieved by setting up Goals (Admin > View > Goals). Some of the goals that we can set (it’s just an indicative list), but not limited to the below are:
- 404 pages
- Form completions
- Bookings
- Duration
- Events
- Destination URLs etc.
It’s important to point out that:
- Once we create Goals we cannot delete them. We can just set the toggle to ‘Off’.
- Goals do not offer data retrospectively but from the moment we set them up.
- 20 Goals are available (and bearing in mind that they cannot be deleted), then they should be used wisely.
The Goal set up is based on pre-determined goals as given by Google Analytics or they can be customised.

Once we have set up the respective goal/goals for our website, then we will be able to monitor their performance (Conversions > Goals).

Implementation of Funnels
Before we finalised the set-up of Goals, we can make an extra step and we can monitor the customer journey (in case we have an e-commerce site, or a travel, hotel website).

In this way we will able to find out if the checkout is effective for users. With funnels, if the check-out process for any reason is interrupted (drop-offs), we will be able to work on split testing in order to make the necessary amendments and improve the conversion rates.
For the ideal check-out process, we will need to create 4 steps (in this process we are not including the receipt/confirmation page).
Filters
Once our new website is launched an in order to exclude any internal IP traffic we will need to go to Filters. All we have to do is to exclude our IP address (Admin > View > Filters)

Implementation of Site Search
In case we are running an e-commerce site or a blog we can implement the site search. In this way we are able to determine which search terms are used more by visitors in order to find products or certain topics (for our blog).
Once we activate the toggle, we will need to implement the respective query parameter.
Now, how are we going to identify the query parameter for our site? We can easily find it out in by performing a query on our blog or on our own e-commerce website.
If the URL of the page (after the ‘?’) is: http://www.myecommercesite.com/blog/?s=black-suits then our query parameter is ‘s’ ( sometimes it can be: ‘q’, ‘query’, ‘search’). Afterwards, we will just include the ‘s’ within the box on Query Parameter and that’s it.

Linking Our AdWords and Google Webmaster Tools with Google Analytics
For AdWords, after the launch of our new site and in case we have also started an AdWords campaign for our site, it would be useful to link our AdWords account with our Analytics:
AdWords Account > AdWords Linking

The reason for linking our AdWords account with our Analytics account is that we will be able to see how much traffic came from our AdWords campaigns to our websites and how many transactions were made in our website through AdWords.
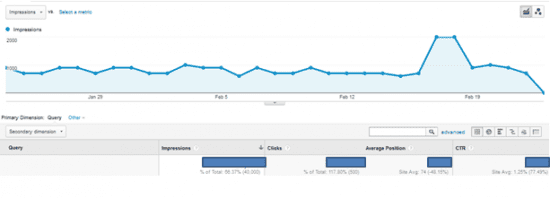
For Google Webmaster Tools (Acquisition > Search Engine Optimisation), once we link these 2 accounts for our website property then we will be able to have access (on Google Analytics) on data such as: queries, impressions clicks, click-through-rate, countries (which these queries came from).
In order to have on Google Analytics this kind of data, then we will need to enable Google Webmaster Tools.
(On Google Analytics this is how it looks before we link these two accounts for our website property)

Once we link our website property on Google Analytics and Google Webmaster Tools, we will be able to access on data related to our website property:
Custom Alerts
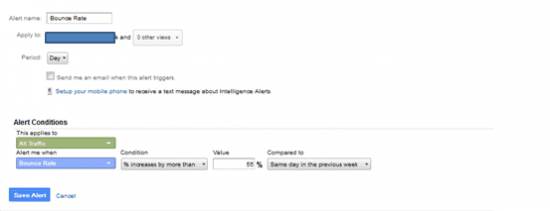
If we want to make sure, after the launch of our site, that everything will run smoothly we can set up customised alerts. In this way we manage to be proactive for any problems that may come up for the website that we are handling. For example, we can set up a custom alert for the event that our website’s bounce rate is greater than 55%.
Advanced Segments / Custom Reports / Dashboards
If we want to isolate our data for the unique needs of our website then we can either create our own advanced segments (customised to our needs) or we can use theGoogle Analytics Solutions Gallery that offers a plethora of options for advanced segments, custom reports, dashboards, etc.
For example in the event that we are handling a government website and the data flow is consecutive and massive, for this reason we can prepare a customised dashboard just for the needs of our website property with customised data in real-time.
Another example of a useful custom report or customised dashboards, is the segmentation or mobile/tablet audience and desktop audience. For more dashboards, custom reports, advanced segments, the Google Analytics Solutions Gallery can cover all our needs.
(Example of a custom dashboard)

Summary
Once our new website is launched, we need to have a checklist (useful for SEO professionals, web developers, digital analysts) that will help them identify on whether all actions have been properly taken in order to increase and/or maintain conversion rates in high standards and why not improve them furthermore (for more details, just refer to the diagram below).
Are there any actions in your checklist that your make sure to implement on Google Analytics after the launch of a website?
