A guide to best practices in video scripting and production to convert more prospects to customers
It happens to far too many businesses. They decide to make their first video, with the idea that it will bring in more customers, get shared by influencers, and maybe even go viral. What’s wrong with this picture? They're set to fail... To avoid this, I've taken all the mistakes I've seen made and highlighted 12 best practice tips, tools and techniques to help create a more effective, higher impact video.
1. Identify ways which highlight your video will fail - ask yourself these questions
While video can be a great medium for achieving these top-of-funnel marketing goals, I see three key ways in which this sets you up for failure:
- 1. ‘Bringing in customers’ and ‘engaging influencers’ tend to be slippery goals. How many more customers should it bring in? Which influencers are going to share it? Far too often, these questions aren’t firmly answered.
- 2. There’s no clear method for achieving these goals. Why should influencers share your video? Why should your target consumers watch it? I often see smart marketers ignore these questions when they get swept up in the creative fervor of a video production.
- 3. Given the challenges above, creating a video that is organically shareable is really hard, and typically, really expensive.
2. Reasons to start in the middle of your sales funnel
Whether you’re an in-house marketer, a business owner or an agency, adding video to your marketing toolbox should start with a focus on the prospects in the middle (not the top) of the sales funnel. These are the people who are aware of your brand and engaging with your content, but haven’t yet pulled the trigger and bought your product or service.
3. Benefits of creating a landing page video
So what does this mean for your first video? It means that, at the end of the process, you can call your output an Explainer Video or a Landing Page Video, but it's only goal is to inspire any visitor to a webpage to take a clear action. Focusing on this goal will help you in a few key ways:
- They’re easy. Many successful landing page videos simply consist of a person talking to camera. If well filmed and edited, these simple pieces can be the cornerstone of your web video strategy.
- They’re cheap. You can realistically make one of these videos for less than $100, including the hire of professional-quality equipment.
- They’re effective. A recent study by Eyeview (pdf) showed that using video for landing pages can increase conversion by 80%.
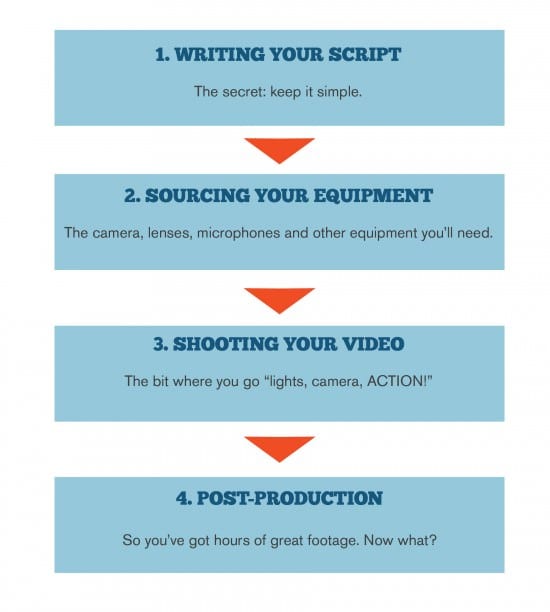
Creating a video can be broken into four steps that require different skills and knowledge. However, if at each step you follow the old design mantra of KISS (Keep it Simple, Stupid), you’ll produce a much better product, and save yourself a lot of stress.

4. Writing your script
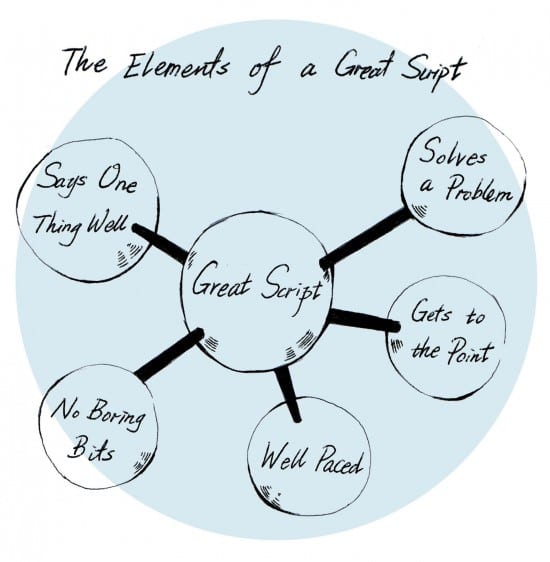
A great script should include each of the following five elements.
- Element 1. It Solves a problem: What action do you want a visitor to this page on your website to take? More importantly, why should they take it? How is your product making their life better? Focusing on the pain point your product relieves will keep your script lean and relevant.
- Element 2: It says one thing well: Most landing page videos fall flat because of their scripts, and most scripts fall flat because they try to say too much. Focus on the above point, and strip away any extraneous details.
- Element 3: It gets to the point: You know how short attention spans are on the internet. Whatever the ‘best bit’ of your video is - a shot, a quote, hopefully the ‘one thing you’re saying well’, find a way to get it into the very beginning of your video. You may want to stick the ending, but if you don’t capture your audience early, they won’t be around to see it.
- Element 4: It focuses on pace: You’ve probably read (and agreed with) the idea that Explainer Videos should be less than 90 seconds long. Maybe you’ve thought that a simple Landing Page video, with a person talking at a camera, should only run for 30 seconds. Sadly, both a 90 second and a 30 second video can easily be too long. Even a six second Vine video can be too long. Why? Because what makes a video drag isn’t its running time, it’s pace.

- Element 5: It’s been ruthlessly edited: Editing your script is where you can perfect your pace. To do so, have someone who wasn’t involved in writing the piece provide you with criticism on the script. Ask them if there were any moments at all where their attention wandered. If so, cut the offending section down, and refocus on ‘saying one thing well’.
5. Sourcing your equipment
If you’re not into camera gear, finding the equipment you need for your shoot can seem pretty daunting. However, there are just a few pieces of essential equipment you need to make a simple video, and each can be rented (or bought) pretty cheaply.
6. Sourcing a Tripod
You don’t need to break the bank here, but a decent and sturdy tripod a fundamental piece of your kit. Even a mediocre camera on a tripod can provide good footage, while hand-holding a quality camera will leave you with shaky, amateur-looking footage.
7. Using your Camera and Lens
The captain-obvious of your video kit, your camera is a place where you can get some real bang for your buck. If you frame your shot in a way that makes the most of the available light, you can try shooting your first video on your smartphone. If you’d like to try using some professional level equipment, hire a DSLR from a site like BorrowLenses.com. Be sure though to hire a quality lens to make sure you get the most of your camera – a 50mm prime should be perfect for interviews or pieces to camera.
8. Using a Lavaliere Microphone
If you plan on recording any speech, a lavaliere microphone is absolutely essential. These mics can be clipped onto your collar to capture an interview with minimal background noise, and can record directly to a smartphone in your pocket.
9. Shooting your Video
When you’re shooting your footage, the keep-it-simple mantra is more essential than at any other point in the video production process. Here are a few pointers that will help you record professional quality footage. You won’t fix it in the post phase!
Possibly the most important thing to know when shooting video is that it’s not going to look any better when you’re done editing it than it does when you shoot it. This means you should take the time you need to get your shot exactly right before you shoot.
Move around the room, bring in some lights and play with the exposure settings on your camera until you’re happy with your shot.
10. When you are a ready to start shooting
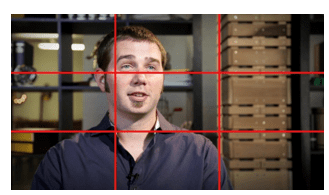
- Frame In Thirds: The ‘Rule of Thirds’ is the central principle of photo and videographic composition. The image shows an example of how it can be applied to an interview.

- Shoot Great B-Roll: B-Roll refers to the supplemental footage used to cover cuts in your main footage. It also provides further visual information for your piece. Some videos may not use any B-Roll, like a simple ‘person talking to camera’ piece.
If you are planning on using B-Roll, however, whether that means product shots, titles or footage from your workplace, be sure to shoot plenty of it, and follow the rules above to make sure it looks great.
11. Post Production
Once you’ve shot all your footage, you’ll probably still want a few ‘assets’ for your video, whether it’s music, pictures, fonts or footage. Here, you’ve got two options:
- Option 1:- Stock Assets: Stock assets are available through sites like Shutterstock, iStock and Audio Jungle. These pieces (especially photos and footage) are shot by professionals, so the quality is consistently high, and the sites are easy to navigate and explore. However, these assets can be expensive, especially in HD, and often have a cookie cutter aesthetic.
- Option 2 - Creative Commons Assets: Creative Commons (CC) assets are free to use, even for commercial purposes, under an attribution license. You can search for CC licensed music on Soundcloud, video on Vimeo, images on Flickr and fonts on Fontsquirrel. Because these assets are categorized by uploaders, they’re typically more difficult to explore, and the quality is much more varied. However, with a little searching you can find some amazing and distinctive stuff, particularly music.
With all your footage and assets in order, editing your video is the last bit of work you’ll have to do. Once again, if you keep this part of the process simple (avoid the flashy titles and transitions), then you’ll save some stress and be happier with your end result. Any user-friendly timeline editor (think iMovie or Windows Movie Maker) is a great place to start editing your first video.
However, if you’d like to experiment with a more powerful program, and you’re interested in adding more advanced titles or effects, then I’d recommend the free trial offered by Adobe Creative Cloud.
If you’d like more detail on writing your script, choosing your equipment, shooting and editing, then our free eBook ‘Make Your Own Explainer Video On a Budget’ will provide all the information you need to dive deeper.

Thanks to Tom Shearman for sharing his thoughts and opinions in this blog post. Tom is a Content Marketing Strategist at
Digital Third Coast Internet Marketing located in Chicago. Like many content marketers, Tom is a recovering Journalist. He’s directed video marketing campaigns for companies from midmarket to Fortune 500s. You can connect with Tom on
Twitter,
LinkedIn and
Google +.


 Thanks to Tom Shearman for sharing his thoughts and opinions in this blog post. Tom is a Content Marketing Strategist at


