A tutorial on creating dark posts - a technique many big brands are now doing newsfeed advertising
Facebook has become quite the place of the dark arts in recent years as brands seek to outdo each other in the advertising wars.
One of the features available to those in the know is the art of the "dark" or "unpublished" post. What this actually means is that the post will not appear on your timeline but can be accessed by anyone with a direct link (or by clicking through from an ad). They are used extensively by advertisers to create copy that then appears as a "Sponsored" piece of content.
A few months back, dark Image posts were the only way advertisers had of getting results into the newsfeed with images that took up a decent amount of real estate. In recent months, links with appropriately sized images have also been rewarded with a decent chunk of screen space on newsfeed.
Dark link posts are, in my opinion, a better bet partly because nowadays you still get a nice big image but crucially users clicking anywhere on the ad go to the post itself rather than a photo (with photo posts they have to actually click on the url you have pasted into the caption to go anywhere other than to the image in your photo albums). You also have significantly more options for copy in the link post option and likes and comments will show up on the post rather than on the photo. I reckon you also stand a higher likelihood of users liking your Page from a link rather than an image post.
Creating a dark or unpublished post
You'll need to be using Power Editor, an essential Chrome app for anyone doing regular advertising on Facebook. Power Editor gives you way more control and functionality than Facebook's Self Serve ad platform.
This article is not intended as an introduction to Power Editor so if you're not yet using it you will possibly need a basic tutorial in that first but see how you get on. If you are fairly IT savvy you can probably pick it up from here.
Having loaded the Chrome Power Editor app and synchronised with your Page and account, first of all you need to go to Manage Pages in Power Editor (left of the top nav)

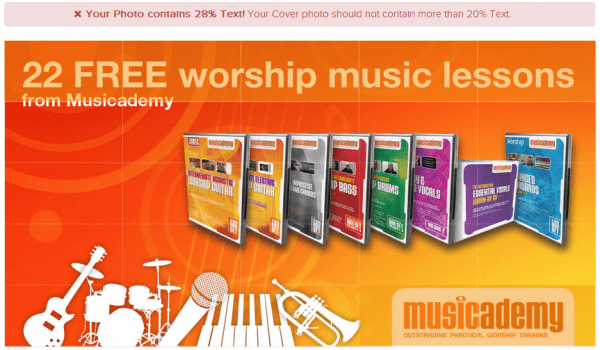
Select your Page and hit "Create Post". I'm creating a Link Post here. Ensure the photo you upload is 1200x627 pixels. And make sure any text it contains is within Facebook's 20% rule (My ad is over that but we got away with it!).
Here's a useful tool for you to use to check that your ads are within the 20% rule. You'll see the obvious problems with my initial ad where the text occupied more than the allowed 5 boxes (copy in pack shots doesn't count but logo copy is included in the 20%). The tool has split the screen into 25 boxes (rather unhelpfully here they are orange on top of my orange background but if you look carefully you will see I actually have text in at least 7 (if not 9) boxes so am over the 20% rule. Of course I went back and changed my ad to comply.
The 1200x627 size will surface nicely both on desktop and mobile devices. The screen clip below is an explanation of where all the elements show up. You may need to test a few to work out maximum line lengths. Unfortunately once created you can't edit an unpublished post so you need to start again from scratch.

I would leave the targeting options blank - you can then select targeting by country when you come to create your ads.
So here is my finished unpublished post:
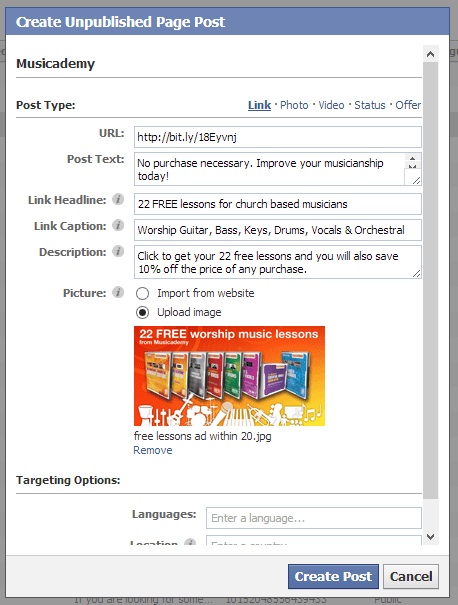
You can see what your post looks like by hitting the "View Post" option a the bottom of the ad. Take note of the url as you may want to go back to it later. Here's the post I created: https://www.facebook.com/222807424432/posts/10152078177919433
If you click through you'll see you are taken to a page on our website which has some clever coding designed to datacapture email addresses and then present the free gift. We've done this in conjunction with our Mailchimp database.
Once you are happy that the post looks good you can create an ad.
Creating a Facebook ad using a dark post
Go to Power Editor and create a new campaign and then create a new ad within the campaign. Having created the campaign upload it by pressing the green button (note you have to upload any changes in Power Editor otherwise your work will be in vain).
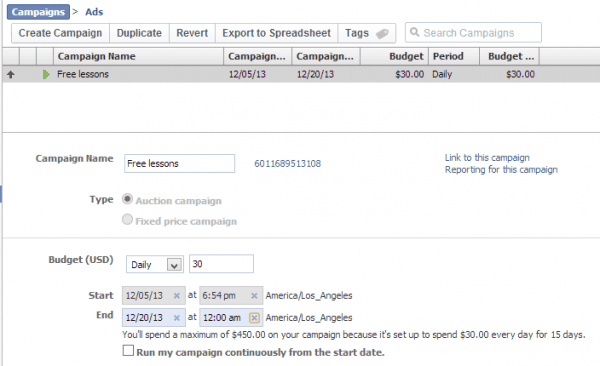
Now with that campaign selected in the left hand nav, create an ad. I tend give it the same title as the campaign (and it's not good practice to have more than one ad in a campaign - I know, it's very annoying). As you start to create a lot of ads you will want to create a naming system that enables you to easily sort and compare them.
Use the wizard going from Creative through to Audience to Optimization and Pricing. You can see the settings I used in the screen clips below (note that I have conversion pixels set up - it's good practice to do this).
Creative
You'll need to select your unpublished post from the Page Post drop down. It will be the one with the half moon symbol.
I am selecting News Feed (Desktop and Mobile). Having tested Right-Hand column ads I've not found them cost effective for my audience. And even if I was using them I'd want to create different ads for them to the News Feed ads.
Now progress to Audience
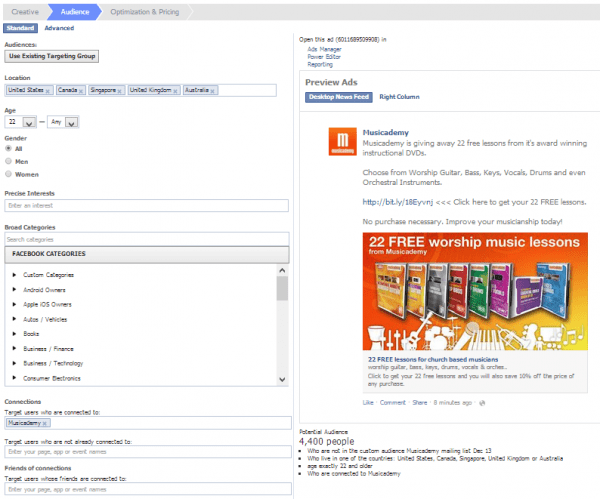
You'll see that I am selecting various countries to target, adding in age and gender as well as targeting people with different interest categories. For this example I'm using a broad category of people who like Christian and Gospel Music. And I don't want to advertise to people who are already fans so these are excluded.
Optimization & Pricing
Now progress to Optimization & Pricing. You have lots of options here. I've tested extensively and for this kind of ad, with my audience I find CPC to be the most cost effective. I wouldn't always go for the lowest option either. I have often gone for say 20c (my account is set in USD) and found my average CPC to be a lot lower.

Now press the green Upload Changes button. Facebook will take anything from minutes to days to check and approve your ad. You may also find that it is initially approved and then unapproved (often due to violation of the 20% rule).
Results - checking effectiveness
Measurement of ad spend has improved a lot in recent years on Facebook. As well as using conversion pixels you can also use custom utm tracking codes in the links you create in your ad. For this ad I used both a mailing list sign up pixel (see below for where to create these in Power Editor) as well as a checkout conversion pixel.

I tend to use the self serve ad manager rather than Power Editor to look at the results of my Facebook ads but with the right utm codes set up you can get quite sophisticated with tracking in Google Analytics too. Crucially with the tracking pixels set up you are not only seeing resulting clicks, Post Likes, Page Likes etc but also conversions to (in this case) mailing list and sales.
Other types of dark posts
I've shown you how to create an unpublished link post. Of course you can also do the same for creating photo posts, video posts, plain status updates and offers. Have a play with them. They are all pretty simple once you've got the first one sorted.
One word of warning, whilst I have found CPC to be best for my audience, I would probably look to use CPM or Optimised CPM for video posts. Reason being that I've found video gets a much higher click rate but often a poor conversion. You therefore want to be paying for eyeballs rather than clicks. But test and see what works for you.


